

How To Install Skype On Windows 8.1
Z7_3054ICK0KGTE30AQO5O3KA30N0
hp-concentra-wrapper-portlet
![]() Actions
Actions
HP PCs - Using Skype to Make Voice and Video Internet Calls (Windows 8)
This document pertains to HP computers with Windows 8.
With Skype, you can use your HP computer to make free voice and video calls to friends, family, co-workers, and other Skype contacts, as well as send instant messages, video messages, and files.
Before you begin
To use Skype, you will need:
-
A high-speed Internet connection.
-
Speakers: Built-in speakers, speakers that can be connected externally, headphones, or a headphone/microphone combination headset.
-
Webcam: A built-in webcam, or a webcam that can be connected externally.
-
Microphone: A built-in microphone, a microphone that can be connected externally, a webcam with a built-in microphone, or a headphone/microphone combination headset.
note:
For best results, use a headset with a built-in microphone and headphones.
System requirements
-
At least a 1 GHz processor.
-
At least 256 MB of RAM.
-
DirectX v9.0 or above.
Bandwidth requirements
The amount of bandwidth necessary for Skype calls varies depending on the type of call.
| Call type | Minimum download speed | Minimum upload speed | Recommended download speed | Recommended upload speed |
| Voice calls | 30 kb/s | 30 kb/s | 100 kb/s | 100 kb/s |
| Video calls | 128 kb/s | 128 kb/s | 300 kb/s | 300 kb/s |
| Screen sharing (Skype for Windows desktop only) | 128 kb/s | 128 kb/s | 300 kb/s | 300 kb/s |
| High-quality video calls | 400 kb/s | 400 kb/s | 500 kb/s | 500 kb/s |
| High-definition video calls | 1.2 Mb/s | 1.2 Mb/s | 1.5 Mb/s | 1.5 Mb/s |
Installing and setting up Skype for Windows 8
If Skype for Windows 8 is not yet installed on the computer, use the following steps to get started.
-
Log in to Windows 8.
-
From the Start screen, click the Windows Store tile.
-
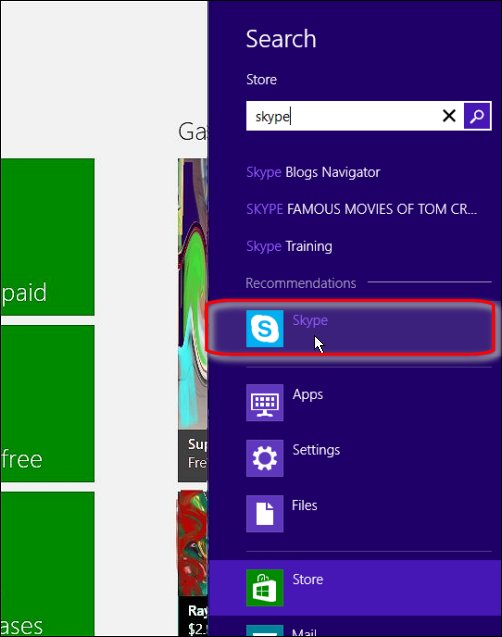
In Windows Store, type Skype.
The search bar opens, with Skype in the search field.
-
In the search results, click the Skype icon.
Figure : Skype in the Windows Store search results
-
In the Skype app in Windows Store, click the Install button.
-
If prompted, log in to Windows as an administrator, and then click Save.
-
To allow Skype to access the webcam and microphone, press the Allow button when prompted.
Figure : Allowing Skype to access the webcam and microphone

-
To allow Skype to run in the background, press the Allow button when prompted.
-
On the Start screen, click the Skype tile to start setting up your account.
Figure : The Skype tile on the Start screen

-
Click one of the following options depending on whether you already have an account with Skype:
-
I have a Skype account
-
I'm new to Skype
-
-
Follow the onscreen instructions to complete the setup. When you complete this process, log in with your Microsoft account.
Adding contacts and accepting contact requests
Once you have installed Skype for Windows 8 and set up the account, follow the steps below to start adding contacts.
-
Log in to Skype.
-
On your Skype account home page, add contacts by right-clicking on any empty space on the page, and then clicking the add contact icon in the lower-right corner.
Figure : Add a contact option
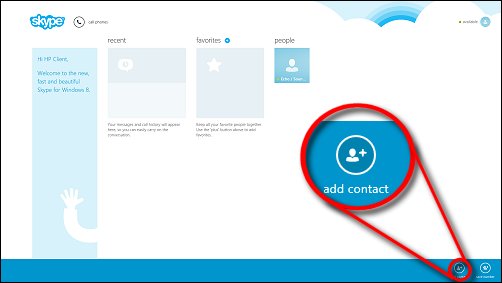
The Search bar opens on the right side of the window.
-
In the search field, enter the name, email address, or Skype name of someone you want to add as a contact, and then press the Enter key.
Figure : The Skype Search bar

The search results page opens.
-
Click the name of the desired contact in the list of search results on the left, or, if the contact is not in the search results, click the search directory button and select the contact from the search results.
Figure : Contact search results

-
In the conversation window, click the Add to Contacts button.
Figure : Add contacts

A contact request opens.
-
Make any desired changes or additions to the contact request, and then click Send.
Figure : New contact request

The new contact appears in your contacts list, and will appear offline until your request is accepted.
-
To approve contact requests, log in to Skype for Windows 8, and on the profile page under recent, click the contact request that you plan to accept.
A conversation window opens.
-
Click the Accept button.
Figure : Accepting a contact request

Making and accepting Skype calls
Once you have installed Skype for Windows 8 and set up your account, you can start making and accepting calls with Skype.
Making calls in Skype for Windows 8
Follow the steps below to make Skype calls.
-
Log in to Skype.
-
Under people or favorites on your account home page, click the contact you want to call.
Figure : Selecting a contact to call

A conversation window opens.
-
In the upper-left area of the conversation window, make a video call by clicking the video call icon; make a voice call by clicking the voice call icon; or send an instant message by clicking the instant message field, typing your message, and then pressing the Enter key.
-
Video calls
-
Voice calls
-
Instant messages
Figure : The icons for video calls, voice calls, and instant messages

-
-
Wait for the other person to answer.
Figure : Waiting for a contact to answer

-
To end or cancel a call, click the red end call icon
 at the bottom of the window.
Accepting calls in Skype for Windows 8
Follow the steps below to accept video and voice calls from Skype contacts.
-
When a notification appears in the upper-right area of the Start screen, click the notification, or click the Skype app tile.
-
Pop-up notification
-
Update in Skype live app tile
Figure : A call notification on the Start screen

-
-
On the Skype account home page, click the desired icon to accept as a video call, accept as a voice call, or to decline the call.
-
Accept as a video call
-
Accept as a voice call
-
Decline the call
Figure : Accepting as a video call or voice call, or declining the call

-
-
Proceed with the call.
Making additional calls while in a call
You can place a second call while in a Skype call. The first call will be put on hold. You can also switch between calls.
-
While in a Skype call, click the back arrow in the upper-left corner to return to the Skype account home page.
Figure : The back arrow to return to the Skype account home page

-
On the Skype account home page, make a second call by clicking another contact.
A notification appears in the upper-right corner of the conversation window, reminding you that the first call is on hold.
Figure : The on-hold notification

-
In the conversation window, click the voice call or video call icon to make the second call.
-
To switch between calls or to go back to the first call when the second conversation has ended, click the on-hold notification in the upper-right corner of the window.
-
Click the resume call button in the center of the window.
Figure : The resume call button

Accepting additional calls while in a call
You can accept incoming Skype calls while in a call. The first call will be put on hold. You can also switch between calls.
-
While in a Skype call, when an incoming-call notification appears in the upper-right area of the conversation window, click the video or voice call icon in the notification.
Figure : The notification for a second incoming call

After accepting the second call, a notification appears in the upper-right corner of the conversation window, reminding you that the first call is on hold.
-
Figure : The on-hold notification
-
To switch between calls or to go back to the first call when the second conversation has ended, click the on-hold notification in the upper-right corner of the window.
-
Click the resume call button in the center of the window to resume the call.
Figure : The resume call button
Using in-call options
While in a Skype call, you can adjust call volume, turn off the webcam so that you cannot be seen, mute the microphone so that you cannot be heard, or select options that allow you to open an on-screen dial pad, send instant messages, or send files.
-
Turning the webcam on or off: Click the webcam icon at the bottom of the window.
-
Muting or unmuting the microphone: Click the microphone icon at the bottom of the window.
-
Sending an instant message, opening the dial pad, or sending files: Click the options icon at the bottom of the window, and then select the desired function from the list.
-
Click to turn the webcam on or off
-
Click to mute or unmute the microphone
-
Click to select from a list of options
-
Click to end a call
Figure : In-call options

-
-
Change the volume
-
Press the Windows
 + C keys.
 -
Select the Settings charm
 from the charms bar.
 -
Click the volume icon near the bottom of the Settings sidebar.
Figure : The volume icon

-
Use the mouse pointer to move the slider up or down to the desired volume.
Figure : Adjusting the call volume

-
Making group voice calls
You can make group voice calls for free using Skype's basic service.
-
Log in to Skype.
-
Select a contact you want to call from the favorites or people lists.
-
In the conversation window, click the + (plus) icon and select add participants from the list.
Figure : The option to add participants to a group voice call

-
On the add participants window, select additional contacts from the list, and then click the add button.
Figure : Adding participants to a group call

-
Click the green call icon.
Figure : Starting the group call

-
Wait for the call participants to answer.
Other options
Change Skype settings, or send files or video messages to contacts.
Sending files in Skype
You can send files to contacts without having to call them.
-
Log in to Skype.
-
On your account home page, open a conversation window by selecting a contact.
-
In the conversation window, click the + (plus) icon and select send files from the list.
Figure : The option to send files

-
Browse to the file location, click on the desired file, and then click Send.
-
Wait while Skype sends the file.
Figure : Sending a file in Skype

Sending a video message
Use the webcam and microphone to record and send a video message.
-
Log in to Skype and click on a contact.
-
In the conversation window, click the + (plus) icon and select send video message from the list.
Figure : The option to send video messages

The video message recording window opens.
-
When ready to record your message, click the record button
 at the bottom of the window.
 -
Record the message, and then click the stop-recording button
 .
. -
To preview the message, click the play button, and then click the send button to send the message, or click the cancel button to delete or re-record the message.
Changing Skype settings
Follow the steps below to change your settings and options.
-
Log in to Skype.
-
While in Skype, press the Windows
+ C keys. -
Select the Settings charm
to open the Settings bar.
To change a specific setting, choose one of the following:
Profile settings
Add a note to let contacts know what is happening today, change your presence status, link to your profile online to edit your information, or sign out of Skype.
In the Settings sidebar, click Profile to change settings.
-
To add a personal note that will appear under your profile picture in a conversation window, enter the information in the enter mood message field.
-
To appear offline to contacts while using Skype, click invisible.
-
To manage your account, edit your profile, or review your Skype history, click account, which opens a web browser and links to your account information.
-
To sign out of Skype, click sign out.
note:
If you signed in to Skype with your Microsoft account, you must sign out of Windows to sign out of Skype.
Figure : Profile sidebar in Skype

Options settings
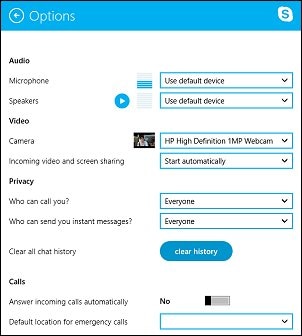
Change your audio, video, privacy, and incoming call settings.
-
Audio
-
Microphone: Test the microphone, or switch to a different microphone by making a selection from the default device drop-down.
-
Speakers: Test the speakers, or switch to different speakers by making a selection from the default device drop-down.
-
-
Video
-
Camera: To ensure that the webcam is working properly, watch the video stream in the window, or switch to a different webcam by making a selection from the drop-down.
-
Incoming video and screen sharing: To control incoming video, select Start automatically from the drop-down if you want to automatically see the video stream from people making video calls. Select Ask to be prompted to choose whether you want to see the video stream from people making video calls.
-
-
Privacy
-
Who can call you? Control incoming calls by choosing Everyone or Contacts from the drop-down.
-
Who can send you instant messages? Control incoming instant messages by choosing Everyone or Contacts from the drop-down.
-
Clear all chat history: Delete the conversation history by clicking the clear history button.
caution:
If you clear your conversation history, you will not be able to restore it and all video messages will be permanently deleted.
-
-
Calls
-
Calls: To automatically answer incoming calls, select Yes by using the mouse pointer to move the slider bar to the right.
Figure : The Options sidebar in Skype
-
Permissions settings
Choose how Skype uses your webcam and microphone, how notifications are displayed, and what Skype is allowed to display when the computer is locked.
-
Under Privacy, turn the webcam and microphone on or off by using the mouse pointer to move the slider bar to the right for On, or to the left for Off.
-
Under Notifications, turn notifications on or off by using the mouse pointer to move the slider bar to the right for On, or to the left for Off.
-
Under Lock screen, use the mouse pointer to move the slider bar to the right to On to allow the app to run in the background and show a quick status on the lock screen, or to the left to Off. When the feature is turned on, a notification will briefly appear on the lock screen in the upper-right corner, and the number of Skype calls or messages received will appear next to the Skype logo
 in the lower-left corner.
Figure : The Permissions sidebar in Skype

Managing contacts
Use the following steps to manage contacts in Skype for Windows 8.
Adding multiple contacts to the favorites list
Add more than one contact at a time to your favorites list.
-
Log in to Skype.
-
To add contacts to your favorites list, click favorites on your Skype account home page.
Figure : The option to designate contacts as favorites

-
In the add favorites window, select the contacts you want to add to your favorites list.
Figure : Adding favorites

-
Click add in the lower-right corner.
Managing individual contacts
Follow the steps below to add individual contacts to your favorites list, view profile information for your contacts, block contacts, block contact requests, and remove existing contacts.
-
Log in to Skype.
-
On the Skype account home page, select a contact from the favorites or people lists.
A conversation window opens.
-
Right-click on any empty space on the conversation window to open the options menu.
-
On the options menu:
-
Click the favorite icon to add or remove the contact to or from the favorites list.
-
Click the view profile icon to view information about the contact, and to view options for connecting.
-
Click the block icon to block a contact, as well as contact requests. In the pop-up window, select remove from people and/or report as spam, and then click the block button.
-
Click the remove icon to remove a contact from your favorites or people lists, and then click the remove button in the pop-up window.
-
Add or remove contacts to or from the favorites list
-
View contact information
-
Block contact/contact request
-
Remove an existing contact
Figure : Options for managing contacts

-
Installing and setting up Skype for Windows desktop
A desktop version of Skype is available in Windows 8. Many of the traditional Skype features that are not available in Skype for Windows 8 are available in Skype for Windows desktop. A Microsoft account is not needed to use the desktop version.
-
From the Start screen, click the Windows desktop tile.
-
On the Windows desktop, open a web browser.
-
Type www.skype.com in the web address field, and then press the Enter key.
-
Click the downloads tab at the top of the page.
Figure : The downloads tab on the Skype website

-
In the middle of the Use one Skype account across all your devices web page, click the Learn about Skype for Windows desktop link under the Windows desktop heading.
Figure : Linking to the Skype for Windows desktop download page

-
On the Skype for Windows desktop page, click the Get Skype for Windows desktop button.
Figure : Get Skype for Windows desktop

-
When the download bar appears at the bottom of your screen, click Save.
Figure : The download bar

-
When the download has completed, click Run.
-
If prompted, log in as an administrator.
-
On the User Account Control window, when asked if you want to allow the program to make changes to the computer, click Yes.
-
On the Installing Skype window, click the Skype's Terms of Use and Skype's Privacy Policy links, review the information, and then click the I agree - next button.
The Skype Click to Call window opens.
-
if you do not want to install the Click to Call feature, remove the selection next to Install Skype Click to Call, and then click Continue.
The Make Bing your search engine and MSN your homepage page opens.
-
If you do not want Bing to be your search engine or MSN to be your homepage, remove the selections next to Make Bing my search engine and/or Make MSN my homepage.
Figure : The option to make Bing the search engine and MSN the homepage

-
The Skype installer opens, and installs Skype.
-
If prompted, click Allow access on the Windows Security Alert window.
-
If you do not want to automatically log in to Skype, remove the selection next to Sign me in when Skype starts.
-
If you already have an account, log in by entering your information in the Skype Name and Password fields, and click Sign in. Click the Create an account link to set up a new account.
Figure : The Skype sign-in page

note:
If creating an account, follow the onscreen instructions, and then continue with the steps below.
-
Click Continue on the Nearly done, just a couple of things window.
-
On the Setting up Skype page, test the sound and microphone, confirm that the webcam works, and then click Continue.
-
On the Setting up Skype page, click Continue.
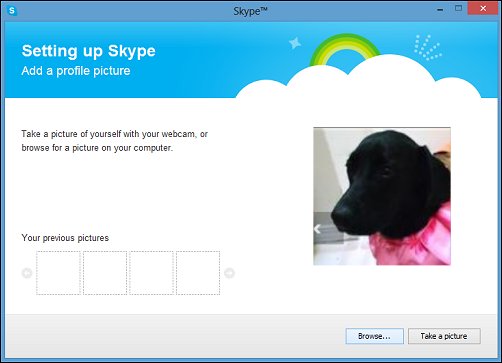
The Setting up Skype - Add a profile picture page opens.
-
Click the Take a picture button to use the computer's webcam to take a picture of yourself, or click the Browse button to navigate to a picture in your files that you would like to use.
Figure : Adding a profile picture
-
Once you have added the picture, click the Use this picture button.
Your Skype account opens.
-
To open Skype for Windows desktop from the Start screen, click the Skype for Windows desktop app tile.
Figure : The Skype for Windows desktop app tile

Frequently asked questions (FAQs)
Refer to this section for answers to frequently asked questions (FAQs) about using Skype in Windows 8.
How can I improve call quality and avoid dropped calls?
There are several ways to improve performance
-
Use a high-speed Internet connection.
-
Close down all other open applications.
-
To avoid dropped calls, make a voice call. If already in a video call, turn off the video function and use voice only.
-
Install any updates to the Skype app available in Windows Store, and ask the person you are calling to do the same.
-
Ensure that you have a strong wireless signal, or connect using an Ethernet cable instead.
-
Use a headset with a built-in microphone.
-
Use a high-quality webcam.
Is there a way to use another app while I'm in a Skype call?
Yes, by using the Windows 8 Snap feature
With Snap, you can split your screen by dragging Skype to one side. You can then open another app on the other side of the screen.
-
Log in to your Skype account.
-
In the Skype app, move the mouse cursor to the top of the Skype window.
-
When the mouse pointer changes from an arrow
 to a hand
  , press and hold the left button on the mouse while dragging the Skype app to the left or right edge of the screen.
Figure : Snapping Skype to the right side of the screen

-
When the black vertical bar appears, release the button on the mouse.
Skype opens on one the side of the screen.
-
Once Skype is open on one side of the screen, press the Windows
key to return to the Start screen. -
On the Start screen, open the second app by clicking the app tile.
The second app opens on the other side of the screen.
Figure : Using HP Recipe Box while in a Skype call

-
To adjust the view, click and hold the vertical black bar, and move it to the left or right.
-
To close one or both apps, move the mouse cursor to the top of the app that you want to shut down.
-
When the mouse pointer changes from an arrow
to a hand , press and hold the left button on the mouse while dragging the Skype app to the bottom of the screen.
Can I import contacts from other applications, such as Facebook, into my Skype for Windows 8 account?
Yes, by installing and using Skype for Windows desktop.
You can use Skype for Windows desktop to import contacts from email accounts, social networking sites, and more. Contacts added to your Skype account through Skype for Windows desktop will automatically be added to your Skype for Windows 8 contact list. For more information, see the Installing and setting up Skype for Windows desktop section of this document.
How can I tell if any of my Skype contacts have been trying to reach me while I was offline?
That information appears on your Skype account home page
Messages and call history appear in the recent column. An orange dot appears at the top of the column listing the number of unreviewed messages and missed calls. The contact name in unreviewed Skype notifications appears in orange. Clicking the notification will open a conversation window, where you can read and reply to messages, review recent activity, and respond to missed calls.
Figure : Unreviewed Skype activity The number of missed calls and messages Unread notifications contain orange lettering

Why am I not receiving notifications for voice messages that my contacts leave for me?
To send and receive voice messages, install Skype for Windows desktop
There is currently no option to send or review voice messages in the Skype for Windows 8 app, but the option is available in Skype for Windows desktop. If you receive a voice message from a contact who is using Skype for Windows desktop, the notification will appear in your Skype for Windows desktop account home page. For more information, see the Installing and setting up Skype for Windows desktop section of this document.
How can I tell how much bandwidth my call is using?
Use Task Manager to monitor the bandwidth used during calls
Open Task Manager while making a call, click the Performance tab, and then click either the Ethernet or the Wi-Fi option, depending on the type of connection you are using. For more information on how to open and use Task Manager, see the HP support document Using Windows 8 Task Manager.
Figure : Monitoring bandwidth with Task Manager

Other related information
For more information on how to use Skype, visit the Skype website.
How To Install Skype On Windows 8.1
Source: https://support.hp.com/id-en/document/c03806613
Posted by: martinezbither.blogspot.com
0 Response to "How To Install Skype On Windows 8.1"
Post a Comment